Today I am going to show you a software that I just made with Laravel. It is a sales system, point of sale, POS or whatever you call it, which is used to keep track of the products that are sold, the sales, and so on.
It is a totally free and open source system; which means that you can use it at no cost, and modify it to your needs or customize it. Among its features we find:
- It Uses Laravel in its latest version (as of this writing)
- Bootstrap is used for styles
- FontAwesome Icons
- Fully responsive system, that is, it works on mobiles, tablets and computers
- Inventory control with sale price, purchase price, profit, stock, etc.
- Option to make sale, adding products
- Checking inventory stock when selling
- Subtraction of stock when selling
- Printing of sales tickets on thermal printer
- Sales report
- User login and registration
- User management
- Customer registration
- Ticket that includes the customer’s name
Now let’s see how I have developed it, where you can download it, and so on.
Sales system design
Laravel uses Blade for the templates, so I have used their system of layouts and inheritance. I define the master template which is based on a Bootstrap 4 starter template:
<!doctype html>
<html lang="es">
<head>
<meta charset="utf-8">
<meta name="viewport" content="width=device-width, initial-scale=1, shrink-to-fit=no">
<meta name="description" content="{{env("APP_NAME")}}">
<meta name="author" content="Parzibyte">
<title>@yield("titulo") - {{env("APP_NAME")}}</title>
<link href="{{url("/css/bootstrap.min.css")}}" rel="stylesheet">
<link href="{{url("/css/all.min.css")}}" rel="stylesheet">
<style>
body {
padding-top: 70px;
/*Para la barra inferior fija*/
padding-bottom: 70px;
}
</style>
</head>
<body>
<nav class="navbar navbar-expand-md navbar-dark bg-dark fixed-top">
<a class="navbar-brand" target="_blank" href="//parzibyte.me/blog">{{env("APP_NAME")}}</a>
<button class="navbar-toggler" type="button" data-toggle="collapse"
id="botonMenu" aria-label="Mostrar u ocultar menú">
<span class="navbar-toggler-icon"></span>
</button>
<div class="collapse navbar-collapse" id="menu">
<ul class="navbar-nav mr-auto">
@guest
<li class="nav-item">
<a class="nav-link" href="{{ route('login') }}">Login</a>
</li>
<li class="nav-item">
<a class="nav-link" href="{{ route('register') }}">
Registro
</a>
</li>
@else
<li class="nav-item">
<a class="nav-link" href="{{route("home")}}">Inicio <i class="fa fa-home"></i></a>
</li>
<li class="nav-item">
<a class="nav-link" href="{{route("productos.index")}}">Productos <i class="fa fa-box"></i></a>
</li>
<li class="nav-item">
<a class="nav-link" href="{{route("vender.index")}}">Vender <i class="fa fa-cart-plus"></i></a>
</li>
<li class="nav-item">
<a class="nav-link" href="{{route("ventas.index")}}">Ventas <i class="fa fa-list"></i></a>
</li>
@endguest
</ul>
<ul class="navbar-nav ml-auto">
@auth
<li class="nav-item">
<a href="{{route("logout")}}" class="nav-link">
Salir ({{ Auth::user()->name }})
</a>
</li>
@endauth
<li class="nav-item">
<a class="nav-link" href="https://parzibyte.me/#contacto">Soporte <i
class="fa fa-hands-helping"></i></a>
</li>
<li class="nav-item">
<a class="nav-link" href="{{route("acerca_de")}}">Acerca de <i class="fa fa-info"></i></a>
</li>
</ul>
</div>
</nav>
<script type="text/javascript">
// Tomado de [https://parzibyte.me/blog/posts/menu-responsivo-bootstrap-4-sin-dependencias/](https://parzibyte.me/blog/posts/menu-responsivo-bootstrap-4-sin-dependencias/)
document.addEventListener("DOMContentLoaded", () => {
const menu = document.querySelector("#menu"),
botonMenu = document.querySelector("#botonMenu");
if (menu) {
botonMenu.addEventListener("click", () => menu.classList.toggle("show"));
}
});
</script>
<main class="container-fluid">
@yield("contenido")
</main>
<footer class="px-2 py-2 fixed-bottom bg-dark">
<span class="text-muted">Punto de venta en Laravel
<i class="fa fa-code text-white"></i>
con
<i class="fa fa-heart" style="color: #ff2b56;"></i>
por
<a class="text-white" href="//parzibyte.me/blog">Parzibyte</a>
|
<a target="_blank" class="text-white" href="//github.com/parzibyte/sistema_ventas_laravel">
<i class="fab fa-github"></i>
</a>
</span>
</footer>
</body>
</html>
So now I just have to overwrite the content. From the template you can see that I show a navigation menu and that I hide some elements in case the user is not logged in.
Routes
We have several routes configured to show interfaces for selling, view sales, print tickets, view products, and so on. All of them are protected with the auth middleware, so they are not allowed to be accessed if you have not logged in.
The web.php file looks like this:
<?php

use Illuminate\Support\Facades\Auth;
use Illuminate\Support\Facades\Route;

/*
|--------------------------------------------------------------------------
| Web Routes
|--------------------------------------------------------------------------
|
| Here is where you can register web routes for your application. These
| routes are loaded by the RouteServiceProvider within a group which
| contains the "web" middleware group. Now create something great!
|
*/

Route::get('/', function () {
    return redirect()->route("home");
});
Route::get("/acerca-de", function () {
    return view("misc.acerca_de");
})->name("acerca_de");

Auth::routes([
    "reset" => false,// no pueden olvidar contraseña
]);

Route::get('/home', 'HomeController@index')->name('home');
// Permitir logout con petición get
Route::get("/logout", function () {
    Auth::logout();
    return redirect()->route("home");
})->name("logout");

Route::middleware("auth")
    ->group(function () {
        Route::resource("productos", "ProductosController");
        Route::get("/ventas/ticket", "VentasController@ticket")->name("ventas.ticket");
        Route::resource("ventas", "VentasController");
        Route::get("/vender", "VenderController@index")->name("vender.index");
        Route::post("/productoDeVenta", "VenderController@agregarProductoVenta")->name("agregarProductoVenta");
        Route::delete("/productoDeVenta", "VenderController@quitarProductoDeVenta")->name("quitarProductoDeVenta");
        Route::post("/cancelarVenta", "VenderController@cancelarVenta")->name("cancelarVenta");
        Route::post("/terminarVenta", "VenderController@terminarVenta")->name("terminarVenta");
    });
In it, the controllers that are resources are registered, as well as other routes such as login, registration, add product to the shopping cart, and so on.
Login to the system
I have used Laravel’s default authentication, so to use the sales system written in PHP & Laravel you have to log in:
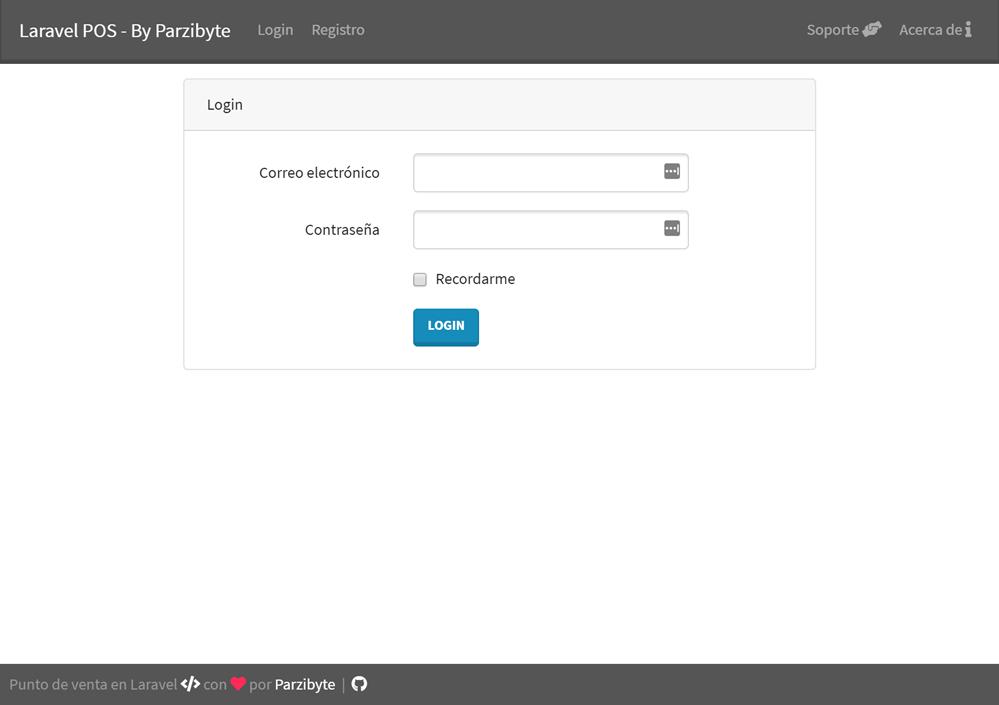
In the same way, a screen is provided to register (so you can register your user and then access the POS), which can be disabled as desired.
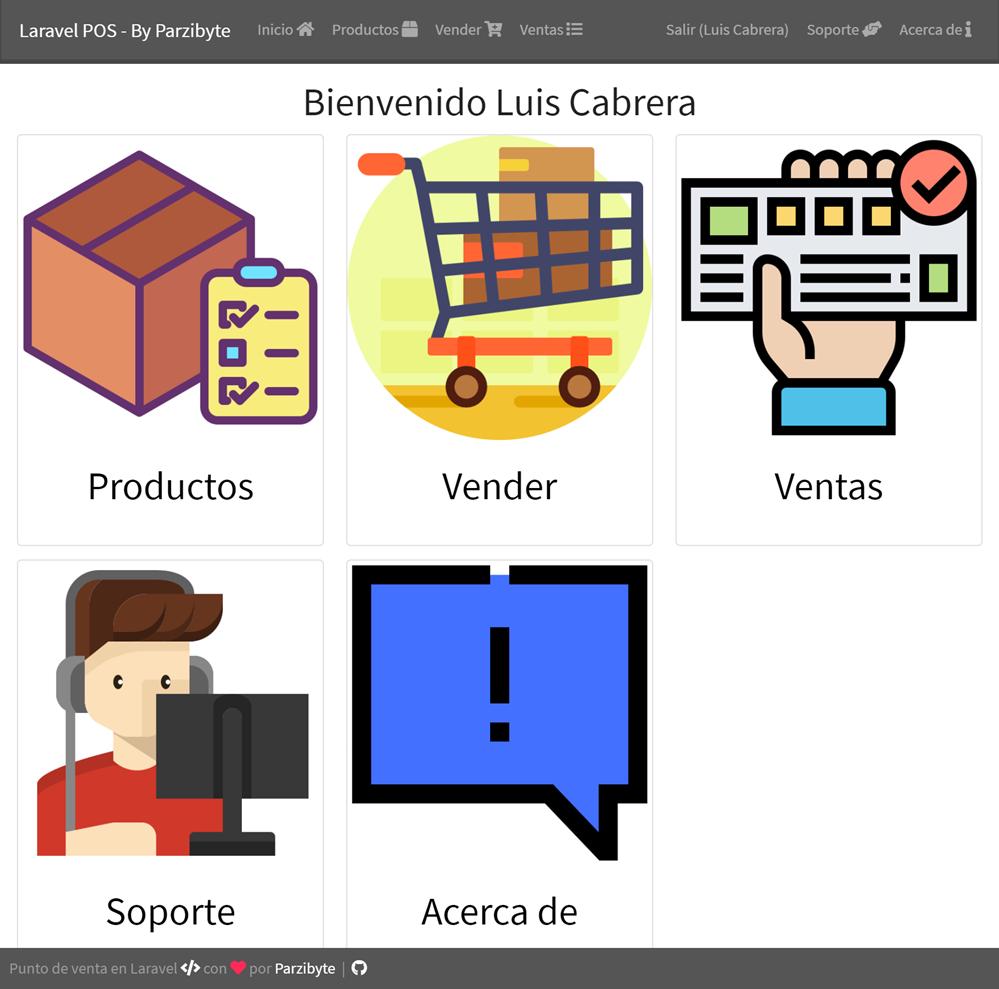
Welcome screen
When you log in you are redirected to the index or welcome screen. It shows shortcuts to the sections of the system:
The index screen code is as follows:
@extends('maestra')
@section("titulo", "Inicio")
@section('contenido')
    <div class="col-12 text-center">
        <h1>Bienvenido, {{Auth::user()->name}}</h1>
    </div>
    <div class="card-columns">
        <a href="{{route("productos.index")}}" style="color: black;">
            <div class="card text-center">
                <img src="{{url("/img/order.png")}}" class="card-img-top">
                <div class="card-body">
                    <h1 class="card-title">Productos</h1>
                </div>
            </div>
        </a>

        <a style="color: black;" target="_blank" href="https://parzibyte.me/#contacto">
            <div class="card text-center">
                <img src="{{url("/img/gamer.png")}}" class="card-img-top">
                <div class="card-body">
                    <h1 class="card-title">Soporte</h1>
                </div>
            </div>
        </a>
        <a style="color: black;" href="{{route("vender.index")}}">
            <div class="card text-center">
                <img src="{{url("/img/sales.png")}}" class="card-img-top">
                <div class="card-body">
                    <h1 class="card-title">Vender</h1>
                </div>
            </div>
        </a>
        <a style="color: black;" href="{{route("acerca_de")}}">
            <div class="card text-center">
                <img src="{{url("/img/about.png")}}" class="card-img-top">
                <div class="card-body">
                    <h1 class="card-title">Acerca de</h1>
                </div>
            </div>
        </a>
        <a style="color: black;" href="{{route("ventas.index")}}">
            <div class="card text-center">
                <img src="{{url("/img/coupon.png")}}" class="card-img-top">
                <div class="card-body">
                    <h1 class="card-title">Ventas</h1>
                </div>
            </div>
        </a>
    </div>
@endsection
I am using Bootstrap cards. And from that you can navigate to the following sections.
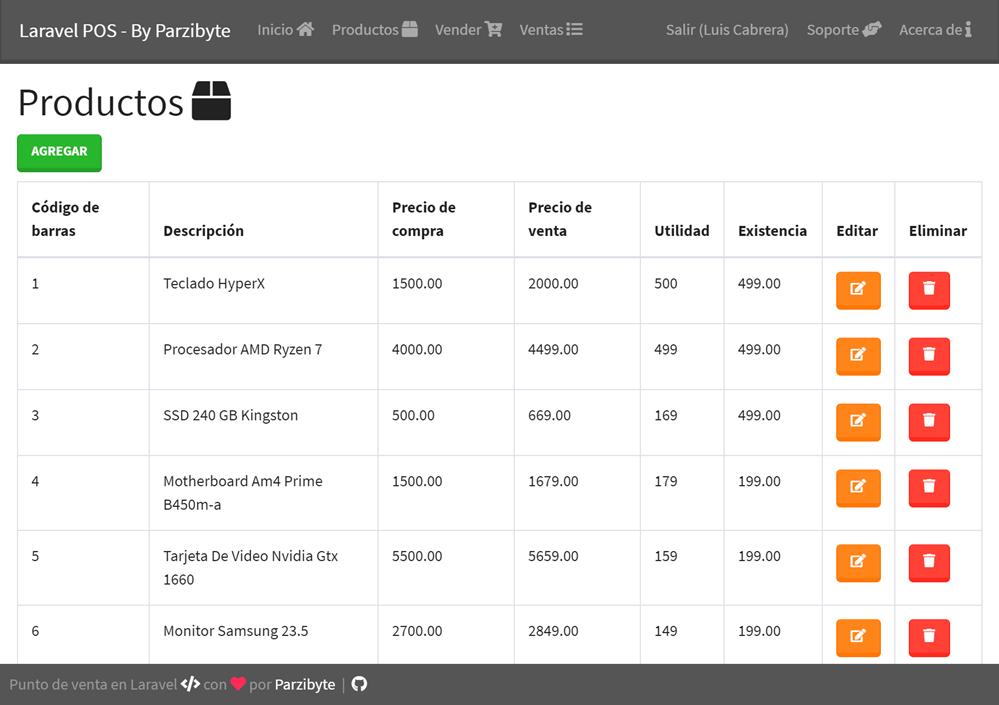
Product management - Inventory
We have product management with Laravel where the stock, the purchase price, the sale price, the barcode and the item description are recorded. The definition of the model and its fillables looks like this:
<?php

namespace App;

use Illuminate\Database\Eloquent\Model;

class Producto extends Model
{
    protected $fillable = ["codigo_barras", "descripcion", "precio_compra", "precio_venta", "existencia",
    ];
}
The form to create a new product is as follows:
@extends("maestra")
@section("titulo", "Agregar producto")
@section("contenido")
    <div class="row">
        <div class="col-12">
            <form method="POST" action="{{route("productos.store")}}">
                @csrf
                <div class="form-group">
                    <label class="label">Código de barras</label>
                    <input required autocomplete="off" name="codigo_barras" class="form-control"
                           type="text" placeholder="Código de barras">
                </div>
                <div class="form-group">
                    <label class="label">Descripción</label>
                    <input required autocomplete="off" name="descripcion" class="form-control"
                           type="text" placeholder="Descripción">
                </div>
                <div class="form-group">
                    <label class="label">Precio de compra</label>
                    <input required autocomplete="off" name="precio_compra" class="form-control"
                           type="decimal(9,2)" placeholder="Precio de compra">
                </div>
                <div class="form-group">
                    <label class="label">Precio de venta</label>
                    <input required autocomplete="off" name="precio_venta" class="form-control"
                           type="decimal(9,2)" placeholder="Precio de venta">
                </div>
                <div class="form-group">
                    <label class="label">Existencia</label>
                    <input required autocomplete="off" name="existencia" class="form-control"
                           type="decimal(9,2)" placeholder="Existencia">
                </div>

                @include("notificacion")
                <button class="btn btn-success">Guardar</button>
                <a class="btn btn-primary" href="{{route("productos.index")}}">Volver al listado</a>
            </form>
        </div>
    </div>
@endsection
It is a simple form that will lead to the following controller or product controller, which in turn is a resource:
<?php

namespace App\Http\Controllers;

use App\Producto;
use Illuminate\Http\Request;

class ProductosController extends Controller
{
    /**
     * Display a listing of the resource.
     *
     * @return \Illuminate\Http\Response
     */
    public function index()
    {
        return view("productos.productos_index", ["productos" => Producto::all()]);
    }

    /**
     * Show the form for creating a new resource.
     *
     * @return \Illuminate\Http\Response
     */
    public function create()
    {
        return view("productos.productos_create");
    }

    /**
     * Store a newly created resource in storage.
     *
     * @param \Illuminate\Http\Request $request
     * @return \Illuminate\Http\Response
     */
    public function store(Request $request)
    {
        $producto = new Producto($request->input());
        $producto->saveOrFail();
        return redirect()->route("productos.index")->with("mensaje", "Producto guardado");
    }

    /**
     * Display the specified resource.
     *
     * @param \App\Producto $producto
     * @return \Illuminate\Http\Response
     */
    public function show(Producto $producto)
    {
        //
    }

    /**
     * Show the form for editing the specified resource.
     *
     * @param \App\Producto $producto
     * @return \Illuminate\Http\Response
     */
    public function edit(Producto $producto)
    {
        return view("productos.productos_edit", ["producto" => $producto,
        ]);
    }

    /**
     * Update the specified resource in storage.
     *
     * @param \Illuminate\Http\Request $request
     * @param \App\Producto $producto
     * @return \Illuminate\Http\Response
     */
    public function update(Request $request, Producto $producto)
    {
        $producto->fill($request->input());
        $producto->saveOrFail();
        return redirect()->route("productos.index")->with("mensaje", "Producto actualizado");
    }

    /**
     * Remove the specified resource from storage.
     *
     * @param \App\Producto $producto
     * @return \Illuminate\Http\Response
     */
    public function destroy(Producto $producto)
    {
        $producto->delete();
        return redirect()->route("productos.index")->with("mensaje", "Producto eliminado");
    }
}
The edit form is very similar to the insert form. To display the products, a responsive Bootstrap table is used in addition to using Blade’s @foreach:
With the result shown in the picture below:
Remember that the full source code can be seen on GitHub; in the end I will leave the link. From here on I will not fully explain the repetitive code, since I already did it with the products. Let’s look at the things that are most important.
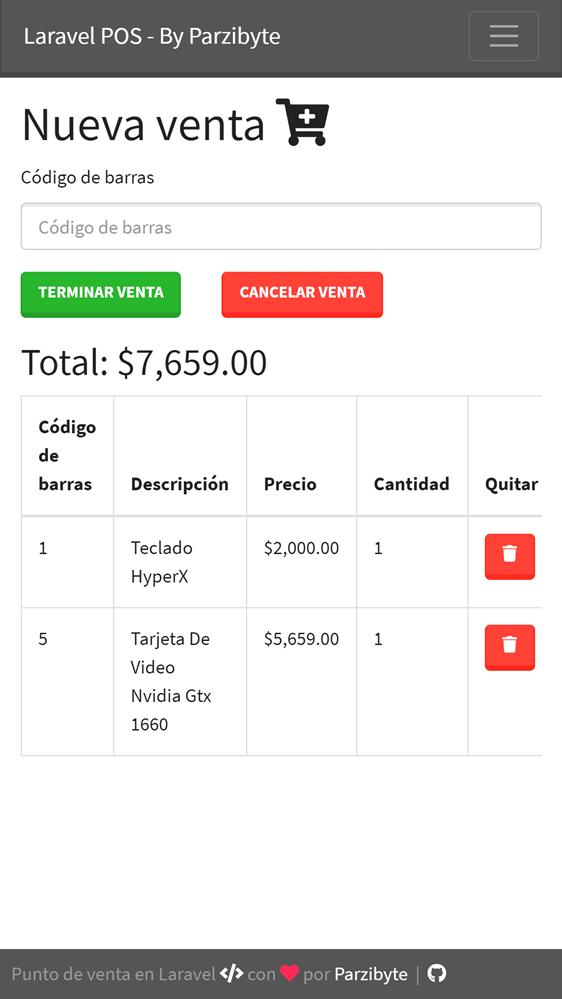
Making sales
Interface to sell
In the interface we have a field that is used to scan the barcode, whether a reader is used or the code is written and the Enter key is pressed.
When there are products, the list of them is shown as well as some buttons to cancel the sale, end the sale or remove a product from the sale list.
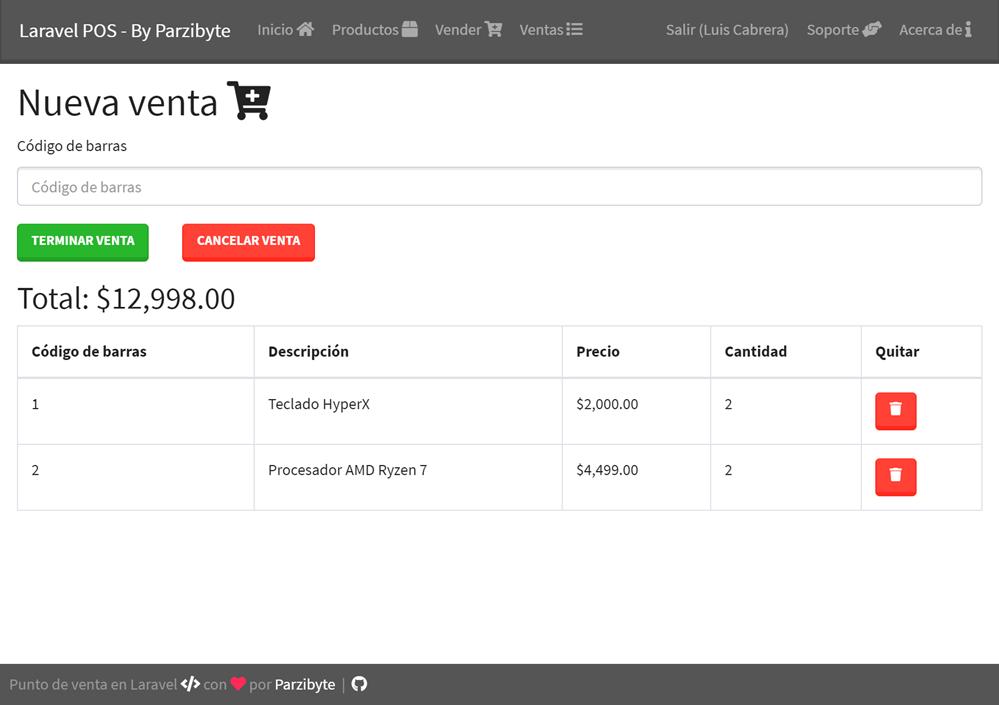
In addition to that, the total of the sale formatted as currency is displayed.
List of products sold
The shopping cart or list of products for sale is saved in the session as an array, in this way it is not lost even if the user refreshes the page or navigates to another place; thus allowing better control.
I have implemented a simple shopping cart with an array, the functions that handle it are:
<?php
private function obtenerProductos()
{
    $productos = session("productos");
    if (!$productos) {
        $productos = [];
    }
    return $productos;
}

private function vaciarProductos()
{
    $this->guardarProductos(null);
}

private function guardarProductos($productos)
{
    session(["productos" => $productos,
    ]);
}

public function cancelarVenta()
{
    $this->vaciarProductos();
    return redirect()
        ->route("vender.index")
        ->with("mensaje", "Venta cancelada");
}

public function quitarProductoDeVenta(Request $request)
{
    $indice = $request->post("indice");
    $productos = $this->obtenerProductos();
    array_splice($productos, $indice, 1);
    $this->guardarProductos($productos);
    return redirect()
        ->route("vender.index");
}

public function agregarProductoVenta(Request $request)
{
    $codigo = $request->post("codigo");
    $producto = Producto::where("codigo_barras", "=", $codigo)->first();
    if (!$producto) {
        return redirect()
            ->route("vender.index")
            ->with("mensaje", "Producto no encontrado");
    }
    $this->agregarProductoACarrito($producto);
    return redirect()
        ->route("vender.index");
}

private function agregarProductoACarrito($producto)
{
    if ($producto->existencia <= 0) {
        return redirect()->route("vender.index")
            ->with([
                "mensaje" => "No hay existencias del producto",
                "tipo" => "danger"
            ]);
    }
    $productos = $this->obtenerProductos();
    $posibleIndice = $this->buscarIndiceDeProducto($producto->codigo_barras, $productos);
    // Es decir, producto no fue encontrado
    if ($posibleIndice === -1) {
        $producto->cantidad = 1;
        array_push($productos, $producto);
    } else {
        if ($productos[$posibleIndice]->cantidad + 1 > $producto->existencia) {
            return redirect()->route("vender.index")
                ->with([
                    "mensaje" => "No se pueden agregar más productos de este tipo, se quedarían sin existencia",
                    "tipo" => "danger"
                ]);
        }
        $productos[$posibleIndice]->cantidad++;
    }
    $this->guardarProductos($productos);
}

private function buscarIndiceDeProducto(string $codigo, array &$productos)
{
    foreach ($productos as $indice => $producto) {
        if ($producto->codigo_barras === $codigo) {
            return $indice;
        }
    }
    return -1;
}
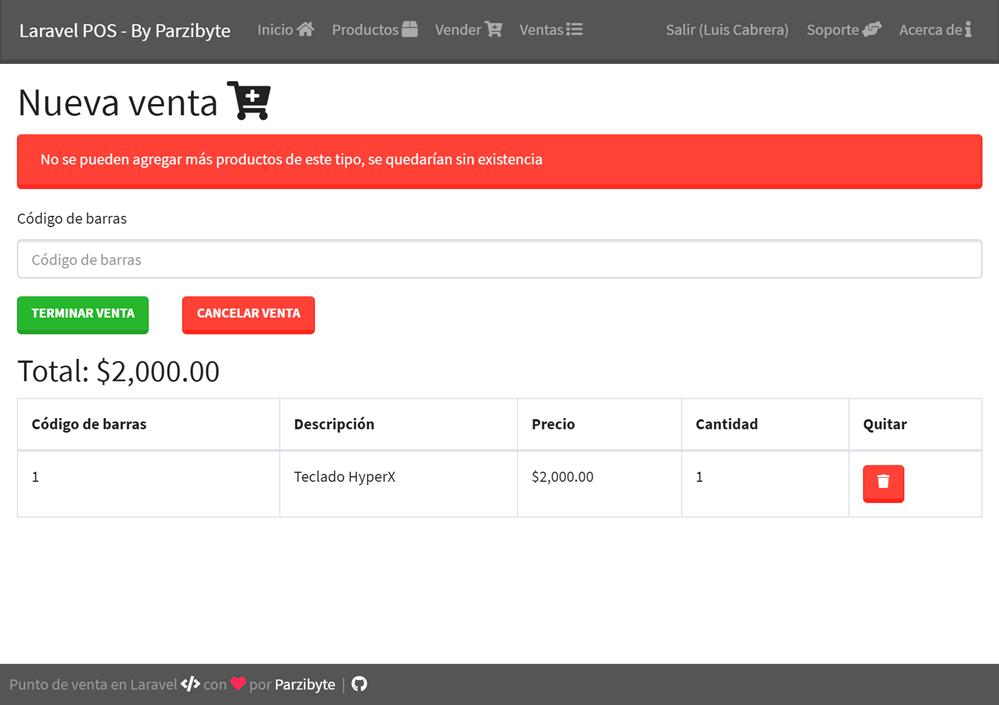
It handles various scenarios. For example, when a product is added, the barcode is sent and a product is searched by that code; then two verifications are made:
- That there is existence of the product
- That when adding the product to the sales list it will not run out of existence
For example, if you want to sell more than what exists, a warning is displayed:
Finish sale
At the end of the sale several things are involved. Starting with that we have a different model called ProductSold (ProductoVendido) that is responsible for encapsulating how a sold product behaves.
I have separated it this way because the sale price will not always be the same; that is, today you can sell a product for 100 dollars that tomorrow will cost 112 for example; then the selling price at which it was sold must be saved for the record.
<?php

namespace App;

use Illuminate\Database\Eloquent\Model;

class ProductoVendido extends Model
{
    protected $table = "productos_vendidos";
    protected $fillable = ["id_venta", "descripcion", "codigo_barras", "precio", "cantidad"];
}
In addition to that, the product has a relationship with the Sales (Ventas) table, which have a creation date (the timestamps) and an id:
<?php

namespace App;

use Illuminate\Database\Eloquent\Model;

class Venta extends Model
{
    public function productos()
    {
        return $this->hasMany("App\ProductoVendido", "id_venta");
    }
}
Here’s an interesting point, as we have a relationship between products and sales, using the relationships that Laravel provides. Finally, to finish the sale, the following is done:
<?php
public function terminarVenta()
{
    // Crear una venta
    $venta = new Venta();
    $venta->saveOrFail();
    $idVenta = $venta->id;
    $productos = $this->obtenerProductos();
    // Recorrer carrito de compras
    foreach ($productos as $producto) {
        // El producto que se vende...
        $productoVendido = new ProductoVendido();
        $productoVendido->fill([
            "id_venta" => $idVenta,
            "descripcion" => $producto->descripcion,
            "codigo_barras" => $producto->codigo_barras,
            "precio" => $producto->precio_venta,
            "cantidad" => $producto->cantidad,
        ]);
        // Lo guardamos
        $productoVendido->saveOrFail();
        // Y restamos la existencia del original
        $productoActualizado = Producto::find($producto->id);
        $productoActualizado->existencia -= $productoVendido->cantidad;
        $productoActualizado->saveOrFail();
    }
    $this->vaciarProductos();
    return redirect()
        ->route("vender.index")
        ->with("mensaje", "Venta terminada");
}
And this is how sold products are saved along with the sale and creation date. Later we will use this to view the sales report, the details of a sale and to print tickets.
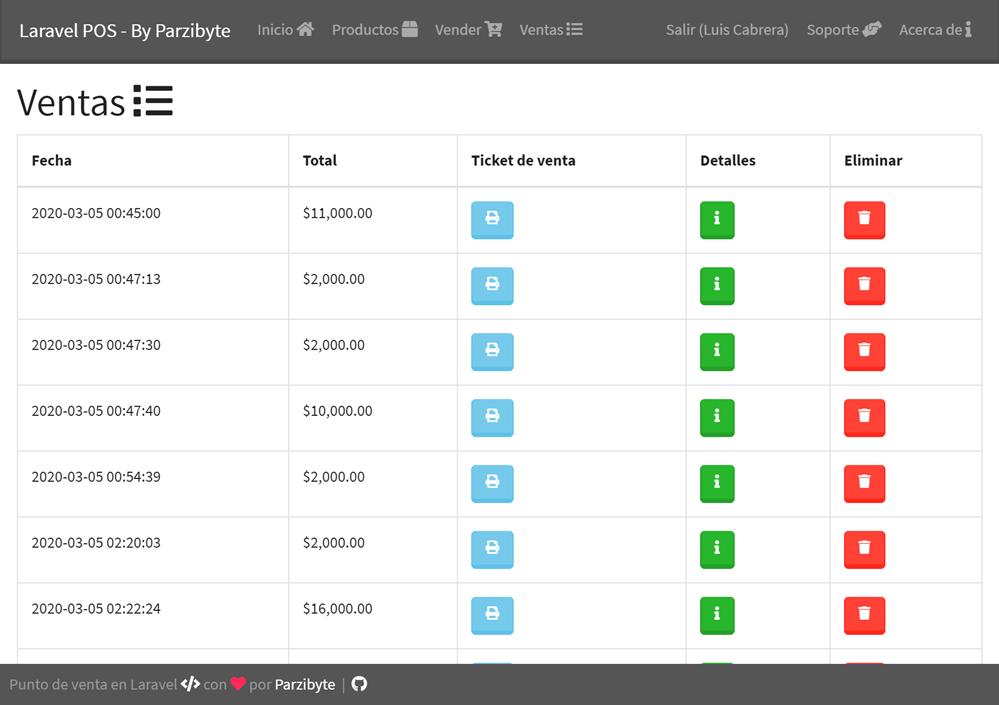
Sales report
The sales report shows the total of the sale, the date of sale and buttons to view the details, print the ticket or delete the sale. The query to list the sales with the total is:
<?php
/**
 * Display a listing of the resource.
 *
 * @return \Illuminate\Http\Response
 */
public function index()
{
    $ventasConTotales = Venta::join("productos_vendidos", "productos_vendidos.id_venta", "=", "ventas.id")
        ->select("ventas.*", DB::raw("sum(productos_vendidos.cantidad * productos_vendidos.precio) as total"))
        ->groupBy("ventas.id", "ventas.created_at", "ventas.updated_at")
        ->get();
    return view("ventas.ventas_index", ["ventas" => $ventasConTotales,]);
}
When the sale detail is shown, we use the controller’s show method, which shows a sale. There, thanks to the relationship that we defined previously, we can obtain the product table and draw the detail as the total:
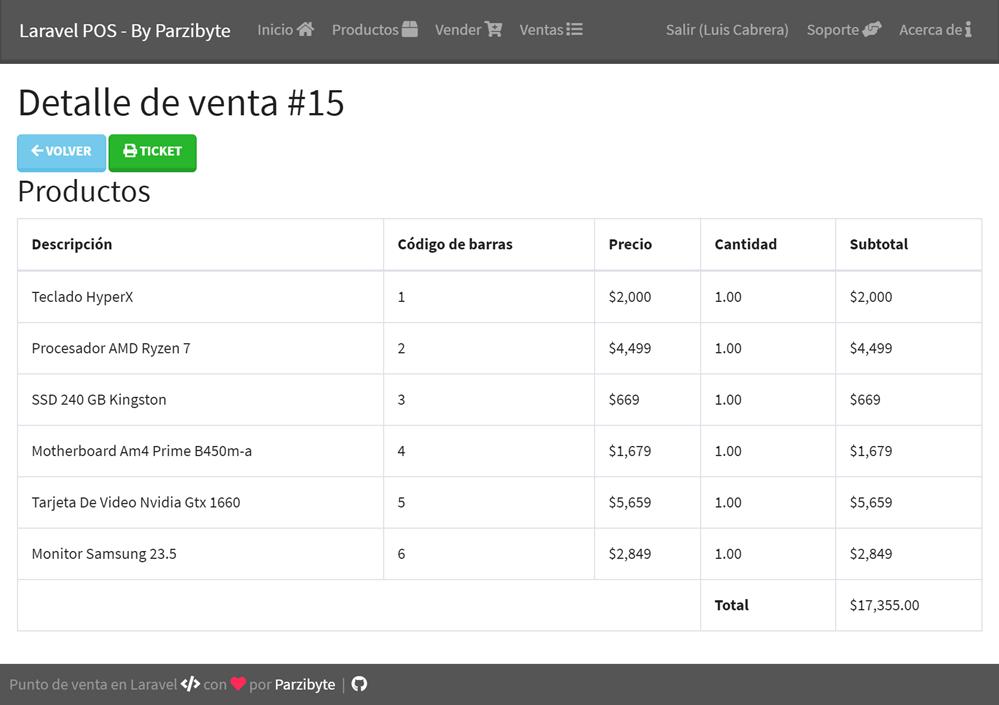
By the way, the view is as follows:
@extends("maestra")
@section("titulo", "Detalle de venta ")
@section("contenido")
<div class="row">
<div class="col-12">
<h1>Detalle de venta #{{$venta->id}}</h1>
@include("notificacion")
<a class="btn btn-info" href="{{route("ventas.index")}}">
<i class="fa fa-arrow-left"></i> Volver
</a>
<a class="btn btn-success" href="{{route("ventas.ticket", ["id" => $venta->id])}}">
<i class="fa fa-print"></i> Ticket
</a>
<h2>Productos</h2>
<table class="table table-bordered">
<thead>
<tr>
<th>Descripción</th>
<th>Código de barras</th>
<th>Precio</th>
<th>Cantidad</th>
<th>Subtotal</th>
</tr>
</thead>
<tbody>
@foreach($venta->productos as $producto)
<tr>
<td>{{$producto->descripcion}}</td>
<td>{{$producto->codigo_barras}}</td>
<td>${{number_format($producto->precio)}}</td>
<td>{{$producto->cantidad}}</td>
<td>${{number_format($producto->cantidad * $producto->precio)}}</td>
</tr>
@endforeach
</tbody>
<tfoot>
<tr>
<td colspan="3"></td>
<td><strong>Total</strong></td>
<td>${{number_format($total, 2)}}</td>
</tr>
</tfoot>
</table>
</div>
</div>
@endsection
That is what is responsible for drawing the table, placing the links, and so on.
Sale ticket
Note: if you want to know how to configure your printer see the post on how to print a ticket in PHP.
Let’s see how the ticket is printed on a thermal printer. What you have to do is install the mike42 library; I was based on my tutorial to print on thermal printer with Laravel.
The controller’s function is as follows:
<?php
public function ticket(Request $request)
{
    $venta = Venta::findOrFail($request->get("id"));
    $nombreImpresora = env("NOMBRE_IMPRESORA");
    $connector = new WindowsPrintConnector($nombreImpresora);
    $impresora = new Printer($connector);
    $impresora->setJustification(Printer::JUSTIFY_CENTER);
    $impresora->setEmphasis(true);
    $impresora->text("Ticket de venta\n");
    $impresora->text($venta->created_at . "\n");
    $impresora->text("https://parzibyte.me/blog\n");
    $impresora->setEmphasis(false);
    $impresora->text("\n===============================\n");
    $total = 0;
    foreach ($venta->productos as $producto) {
        $subtotal = $producto->cantidad * $producto->precio;
        $total += $subtotal;
        $impresora->setJustification(Printer::JUSTIFY_LEFT);
        $impresora->text(sprintf("%.2fx%s\n", $producto->cantidad, $producto->descripcion));
        $impresora->setJustification(Printer::JUSTIFY_RIGHT);
        $impresora->text('$' . number_format($subtotal, 2) . "\n");
    }
    $impresora->setJustification(Printer::JUSTIFY_CENTER);
    $impresora->text("\n===============================\n");
    $impresora->setJustification(Printer::JUSTIFY_RIGHT);
    $impresora->setEmphasis(true);
    $impresora->text("Total: $" . number_format($total, 2) . "\n");
    $impresora->setJustification(Printer::JUSTIFY_CENTER);
    $impresora->setTextSize(1, 1);
    $impresora->text("Gracias por su compra\n");
    $impresora->text("https://parzibyte.me/blog/en/");
    $impresora->feed(5);
    $impresora->close();
    return redirect()->back()->with("mensaje", "Ticket impreso");
}
We start by obtaining the sale by ID, the same variable that is passed through the URL. The name of the printer is in the .env file, so it can be easily configured.
We print the header, the date of the sale and then we go through the products of the sale (previously registered in the database). For each one we draw the quantity, the description and the subtotal.
At the bottom of the ticket we print the total and a thank you message. Later it is redirected to the page it came from and if everything is fine, the ticket should look similar to the one in the following image:
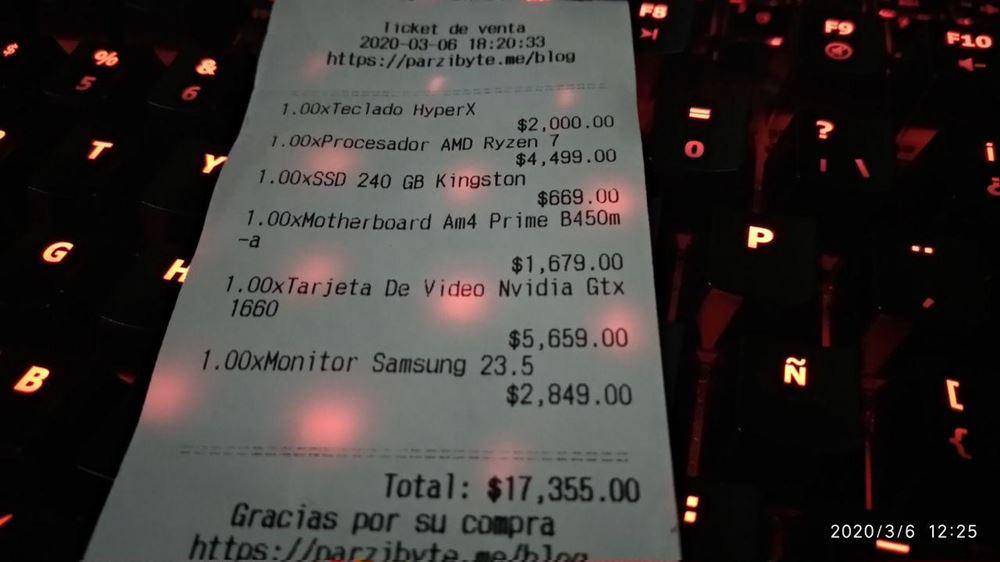
Obviously the ticket will change depending on the list of products, and it is totally dynamic.
Responsive sales system
I want to show that this system adapts to any screen size. For example, on a mobile phone it looks like this:
Therefore you can use it in a local area network or upload it to a hosting; you can visit it from anywhere.
Download software and view source code
The source code for the program is in my GitHub repository. If you want to download the code, click on Clone or download> Download ZIP within the repository. To use it, configure the env file, install the dependencies with composer and make the necessary migrations with php artisan migrate.
Installing system
You can watch this YouTube video where I show you how to install this free laravel based system:
https://www.youtube.com/watch?v=HINrotzpaSs
Demo
You can watch a video where the system is in action:
https://www.youtube.com/watch?v=ypkwVGls-7Y
You can also test it online.
Conclusion
For a class that I am currently taking at the university I had to do a CRUD with Laravel, but I had wanted (for a long time) to make a point of sale with Laravel and add some things like ticket printing.
If you like the framework, I invite you to read more about Laravel on my blog. I also invite you to see my other projects, some of them open source.
Note: I have added more modules to this system, including the clients module and the users module.