In this post I will introduce to you a plugin for printing tickets, receipts or invoices on a thermal printer using client-side JavaScript even if your web page or application is on a cloud server.
This plugin allows you to print directly from browsers, without dialogs and without browsers compatibility issues because you only have to send a HTTP request to print silently and in the background.
As we know, printing a ticket with JavaScript, CSS & HTML is possible, but difficult for the end user, because you have to select the printer and confirm the printing.
Another disadvantage of printing with JavaScript without a plugin is that we cannot cut the paper, open the cash drawer or things like that.
That’s why I created the solution to the problem and I come to expose it. And no, it is not a misleading post.
New: use the free receipt designer
Now you can use this plugin with the brand new ESC POS thermal printer receipt maker: https://parzibyte.me/apps/ticket-designer/#/first-steps
A free plugin for printing in thermal printers directly from browser
That is why I have decided to create a plugin to print with JavaScript, without any dependency and using pure JavaScript client side.
If you want to jump to the examples or download the plugin, go to the docs.
What comes next are technical details of how the plugin works.
Sordid details following…
How does it work?
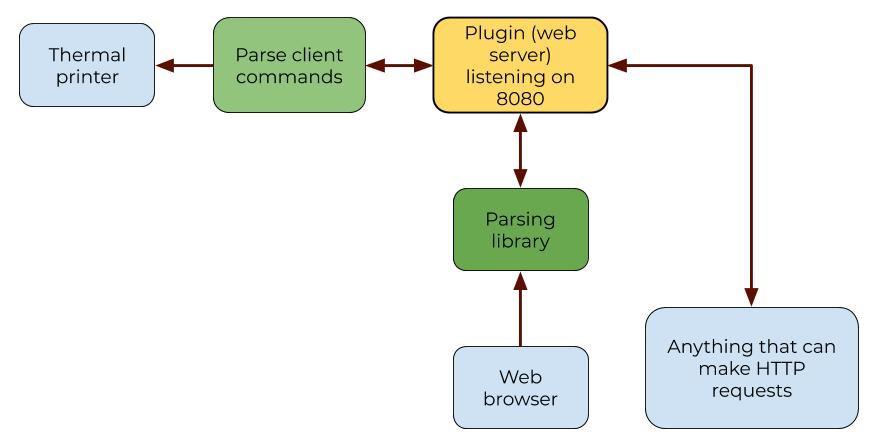
The operation is simple. The plugin, which is an executable, creates a web server on port 8000 (which only lives while the plugin is running) and listens for requests.
The plugin, unlike JavaScript, can interact with the user’s computer, so you just tell it what to do over HTTP.
JavaScript is really good at making HTTP requests through, for example, fetch.

The plugin behaviour is best illustrated with the above image.
Because the plugin speaks HTTP, a ticket can be printed from any programming language that can communicate with the plugin.
The library
Not all tickets are the same, and that is why I had to create a way to make the user print and modify editable and custom tickets.
To do this, I made an array where the actions are placed. Within the plugin I simply interpret them and send them to the printer.
Actions are an object that has a name (nombre) and arguments (argumentos), which is the data used for the action.
It looks best illustrated in this class:
class Operacion {
    constructor(nombre, argumentos) {
        this.nombre = nombre;
        this.argumentos = argumentos;
    }
}
All these actions are added to an array; through the methods that the ConectorPlugin class exposes: https://github.com/parzibyte/ejemplos-javascript-plugin-v3/blob/main/ConectorJavaScript.js
This class simply tries to validate the data a bit, but in the end, what is sent in the imprimirEn method is an array of objects.
On the server side that is also validated, and that’s all.
Hello world
To use this plugin, first you need to download it here: https://github.com/parzibyte/plugin-impresora-termica-v3/releases/latest
Then you need to install your printer and share it:
https://parzibyte.me/blog/en/posts/how-to-share-printer-windows/
Now you can go and try the live examples: https://parzibyte.github.io/ejemplos-javascript-plugin-v3/hola.html
That’s all. If an example worked for you, then you can call the plugin from any language and check the examples source code. Refer to the examples in the previous link or check them in GitHub: https://github.com/parzibyte/ejemplos-javascript-plugin-v3/