En este post te mostraré cómo leer el ID de una tag o tarjeta RFID y enviarla a un servidor Apache con PHP para guardarla, procesarla, etcétera.
Aunque este ejemplo está creado con PHP, podrías enviar el valor a cualquier servidor web con cualquier lenguaje de programación que soporte HTTP.
Lo que haremos será usar una tarjeta ESP8266 que ya tiene WiFi integrado, además de un lector RFID RC522. Básicamente será poner juntos dos tutoriales:
De igual modo veamos cómo hacerlo; te dejaré el código de ejemplo tanto de la tarjeta (en C++) como del servidor web (en PHP).
Circuito
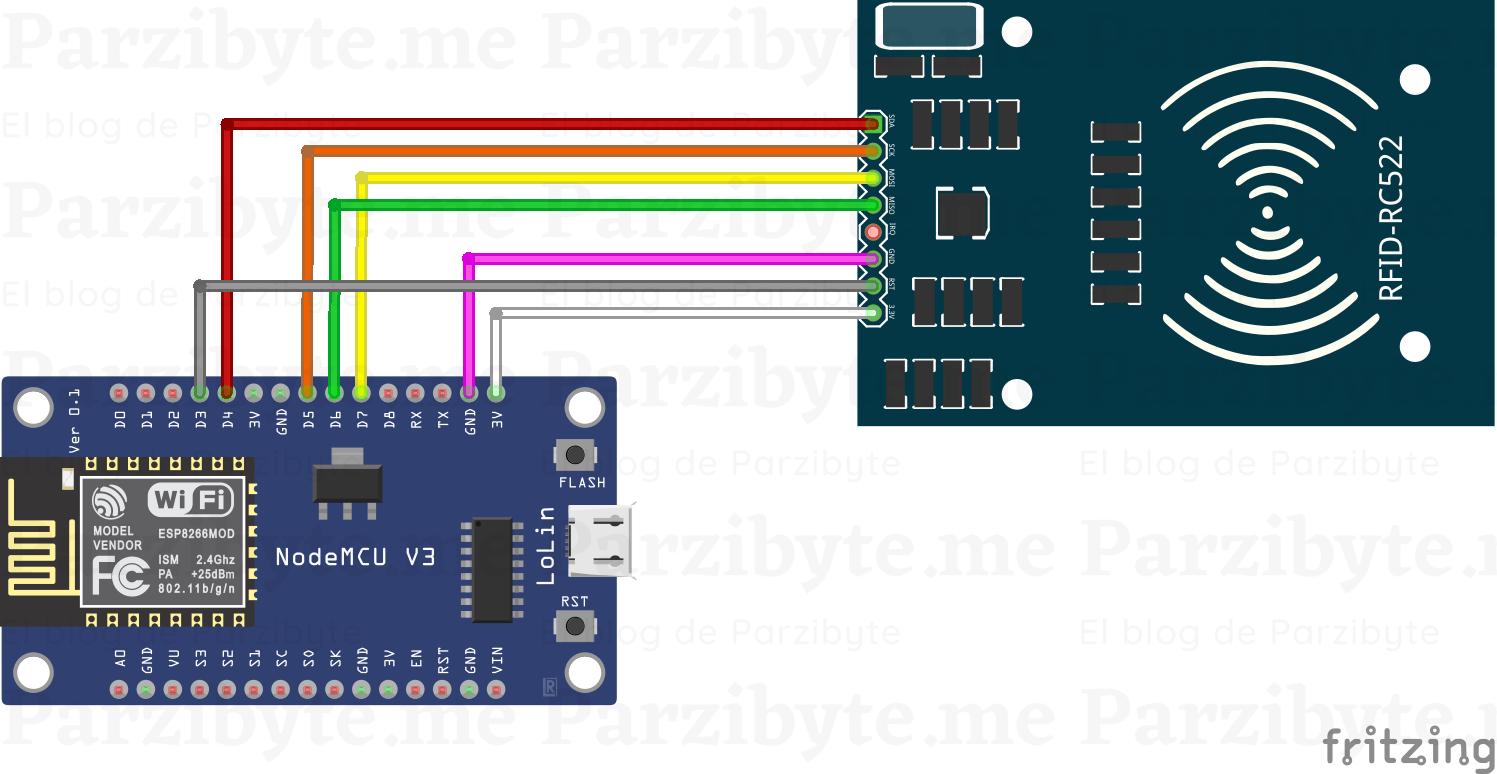
Comencemos viendo el circuito. En este caso es el mismo que usamos en el tutorial anterior, pues vamos a leer el ID de la tarjeta. Lo que cambiará es que haremos una petición HTTP, pero como el “módulo” encargado de la comunicación ya viene integrado, no hace falta modificar el cableado.

Es buen momento para indicarte que leas los posts que cito en caso de que te falte alguna librería o quieras ver un ejemplo más simple. Igualmente te dejaré el código completo al final del post, pero nunca está de más estudiar un poco.
Código del servidor
Para hacer las cosas simples solo vamos a guardar el id de la tarjeta, mismo que estará en la URL. En este caso vamos a usar un archivo de texto para guardar el valor, pero recuerda que siempre puedes usar bases de datos.
<?php
/*
  ____          _____               _ _           _
 |  _ \        |  __ \             (_) |         | |
 | |_) |_   _  | |__) |_ _ _ __ _____| |__  _   _| |_ ___
 |  _ <| | | | |  ___/ _` | '__|_  / | '_ \| | | | __/ _ \
 | |_) | |_| | | |  | (_| | |   / /| | |_) | |_| | ||  __/
 |____/ \__, | |_|   \__,_|_|  /___|_|_.__/ \__, |\__\___|
         __/ |                               __/ |
        |___/                               |___/

____________________________________
/ Si necesitas ayuda, contáctame en \
\ https://parzibyte.me               /
 ------------------------------------
        \   ^__^
         \  (oo)\_______
            (__)\       )\/\
                ||----w |
                ||     ||
Creado por Parzibyte (https://parzibyte.me).
------------------------------------------------------------------------------------------------
Si el código es útil para ti, puedes agradecerme siguiéndome: https://parzibyte.me/blog/pages/sigueme/
Y compartiendo mi blog con tus amigos
También tengo canal de YouTube: https://www.youtube.com/channel/UCroP4BTWjfM0CkGB6AFUoBg?sub_confirmation=1
------------------------------------------------------------------------------------------------
*/
$serial = $_GET["serial"];
$date = date("Y-m-d H:i:s");
$data = sprintf("On %s we got this serial: %s\n", $date, $serial);
file_put_contents("data.txt", $data, FILE_APPEND);
# Respond to the client
printf("Serial %s saved", $serial);
La respuesta que le damos al cliente será “Serial [SERIAL] guardado”; aunque como siempre, puedes responder una cadena vacía o responder cualquier otra cosa y manejarla del lado del cliente.
Es importante notar que en mi caso, el proyecto estará en una carpeta llamada esp8266_rfid_api y que el archivo se llama save_rfid.php por lo que la URL será localhost/esp8266_rfid_api/save_rfid.php pero en mi red local tengo la IP 192.168.1.77 así que debo hacer la petición (desde la ESP8266) a la URL http://192.168.1.77/esp8266_rfid_api/save_rfid.php.
Por favor toma en cuenta eso cuando hagas tus pruebas; igualmente puedes subir el contenido a un servidor de internet, simplemente cambia los valores.
Algoritmo del cliente
Veamos lo que haremos en el cliente; es decir, en la tarjeta ESP8266 pero explicado con lenguaje humano.
En el setup iniciamos el Serial. El Serial es para depurar y enviar mensajes a la computadora usando el cable USB. Recuerda deshabilitar este apartado en caso de que conectes la tarjeta NodeMCU ESP8266 a una computadora que no cuente con el monitor serial abierto. Ya que el código va a esperar hasta que haya comunicación.
Igualmente en el setup es en donde conectamos a la red WiFi con las credenciales de acceso establecidas, iniciamos el lector y preparamos la clave de encriptación para leer la o las tarjetas.
Luego, en el loop, que es el que se repetirá indefinidamente, comenzamos comprobando si estamos conectados a la red Wifi, en caso de que no, detenemos el proceso (el proceso, pero el loop seguirá corriendo).
También en el loop comprobamos si hay una tarjeta y la intentamos leer. En caso de que sea legible, la leemos y justo aquí es en donde enviamos el serial a PHP usando una petición HTTP.
En resumen, la petición se hará tan pronto acerquemos una tarjeta RFID al lector.
Código fuente para leer RFID y enviar a PHP
Finalmente veamos el código de la tarjeta. Yo uso PlatformIO, pero debe funcionar igualmente con el IDE Arduino haciendo las modificaciones necesarias.
/*
  ____          _____               _ _           _
 |  _ \        |  __ \             (_) |         | |
 | |_) |_   _  | |__) |_ _ _ __ _____| |__  _   _| |_ ___
 |  _ <| | | | |  ___/ _` | '__|_  / | '_ \| | | | __/ _ \
 | |_) | |_| | | |  | (_| | |   / /| | |_) | |_| | ||  __/
 |____/ \__, | |_|   \__,_|_|  /___|_|_.__/ \__, |\__\___|
         __/ |                               __/ |
        |___/                               |___/

____________________________________
/ Si necesitas ayuda, contáctame en \
\ https://parzibyte.me               /
 ------------------------------------
        \   ^__^
         \  (oo)\_______
            (__)\       )\/\
                ||----w |
                ||     ||
Creado por Parzibyte (https://parzibyte.me).
------------------------------------------------------------------------------------------------
Si el código es útil para ti, puedes agradecerme siguiéndome: https://parzibyte.me/blog/pages/sigueme/
Y compartiendo mi blog con tus amigos
También tengo canal de YouTube: https://www.youtube.com/channel/UCroP4BTWjfM0CkGB6AFUoBg?sub_confirmation=1
------------------------------------------------------------------------------------------------
*/
#include <Arduino.h>
#include <ESP8266WiFi.h>
#include <ESP8266HTTPClient.h>
#include <SPI.h>
#include <MFRC522.h>

/*
In the ESP8266, D3 pin is RST_PIN and
D4 pin is SS_PIN
*/
#define RST_PIN D3
#define SS_PIN D4

MFRC522 reader(SS_PIN, RST_PIN);
MFRC522::MIFARE_Key key;

// Credentials to connect to the wifi network
const char *ssid = "SSID";
const char *password = "PASSWORD";
/*
The ip or server address. If you are on localhost, put your computer's IP (for example http://192.168.1.65)
If the server is online, put the server's domain for example https://parzibyte.me
*/
const String SERVER_ADDRESS = "http://192.168.1.77/esp8266_rfid_api";
void setup()
{
  Serial.begin(9600); // Initialize serial communications with the PC. Just for debug
  while (!Serial)
    ;

  // Connect to wifi
  WiFi.begin(ssid, password);
  while (WiFi.status() != WL_CONNECTED)
  {
    delay(1000);
    Serial.println("Connecting...");
  }
  Serial.println("Connected!");

  SPI.begin();

  reader.PCD_Init();
  // Just wait some seconds...
  delay(4);
  // Prepare the security key for the read and write functions.
  // Normally it is 0xFFFFFFFFFFFF
  // Note: 6 comes from MF_KEY_SIZE in MFRC522.h
  for (byte i = 0; i < 6; i++)
  {
    key.keyByte[i] = 0xFF; //keyByte is defined in the "MIFARE_Key" 'struct' definition in the .h file of the library
  }
  Serial.println("Ready!");
}

void loop()
{
  // If not connected, we don't need to read anything, that would be unnecessary
  if (WiFi.status() != WL_CONNECTED)
  {
    Serial.println("WiFi not available");
    return;
  }
  // But, if there is a connection we check if there's a new card to read

  // Reset the loop if no new card present on the sensor/reader. This saves the entire process when idle.
  if (!reader.PICC_IsNewCardPresent())
  {
    return;
  }

  // Select one of the cards. This returns false if read is not successful; and if that happens, we stop the code
  if (!reader.PICC_ReadCardSerial())
  {
    return;
  }

  /*
    At this point we are sure that: there is a card that can be read, and there's a
    stable connection. So we read the id and send it to the server
  */

  String serial = "";
  for (int x = 0; x < reader.uid.size; x++)
  {
    // If it is less than 10, we add zero
    if (reader.uid.uidByte[x] < 0x10)
    {
      serial += "0";
    }
    // Transform the byte to hex
    serial += String(reader.uid.uidByte[x], HEX);
    // Add a hypen
    if (x + 1 != reader.uid.size)
    {
      serial += "-";
    }
  }
  // Transform to uppercase
  serial.toUpperCase();

  // Halt PICC
  reader.PICC_HaltA();
  // Stop encryption on PCD
  reader.PCD_StopCrypto1();

  HTTPClient http;

  // Send the tag id in a GET param
  const String full_url = SERVER_ADDRESS + "/save_rfid.php?serial=" + serial;
  http.begin(full_url);

  // Make request
  Serial.println("Making request to " + full_url);
  int httpCode = http.GET();
  if (httpCode > 0)
  {
    if (httpCode == HTTP_CODE_OK)
    {

      const String &payload = http.getString().c_str(); //Get the request response payload
      Serial.println("Request is OK! The server says: ");
      Serial.println(payload);
    }
    else
    {
      Serial.println("Error: httpCode was " + http.errorToString(httpCode));
    }
  }
  else
  {
    Serial.println("Request failed: " + http.errorToString(httpCode));
  }

  http.end(); //Close connection
}
En resumen, al acercar una tarjeta RFID para que se lea, el ID será enviado al servidor web con PHP en un instante. Y de este modo ya habremos leído etiquetas RFID usando la tarjeta ESP8266 y PHP.
Demostración

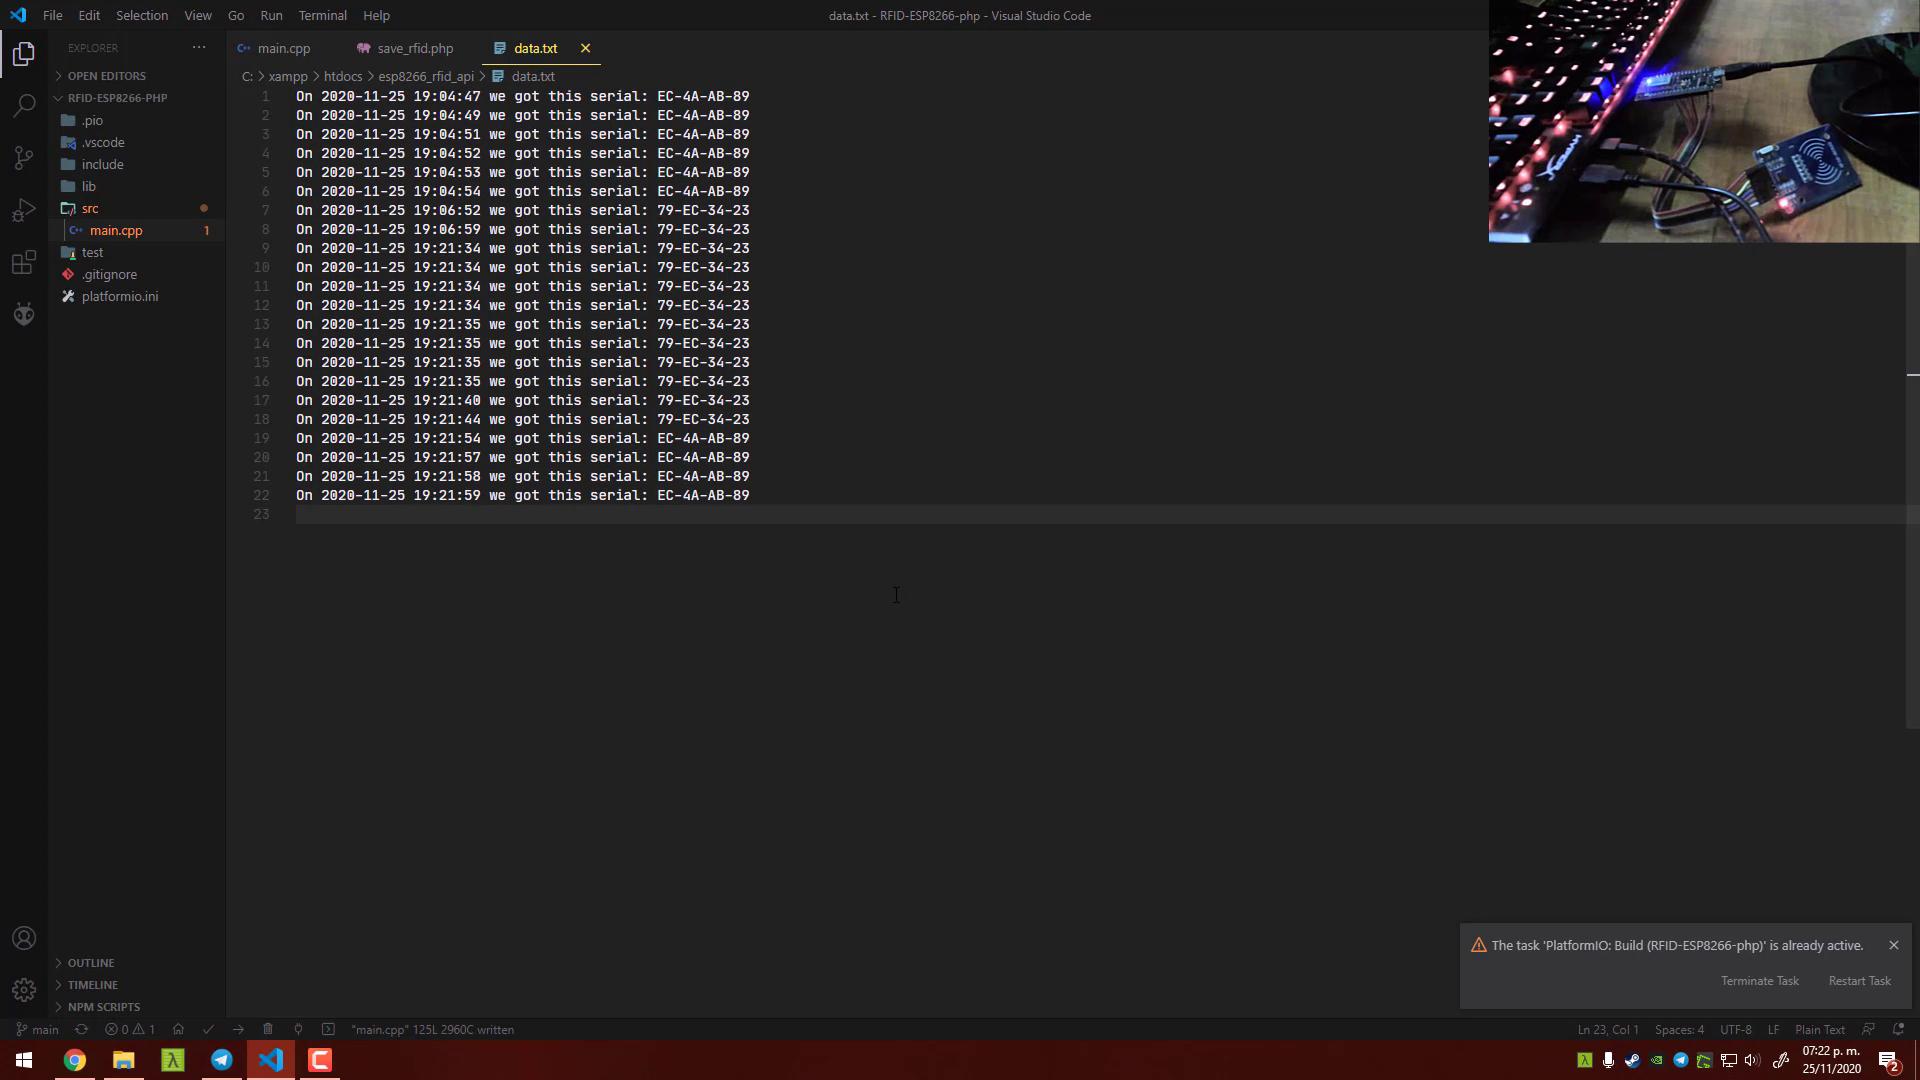
Veamos una demostración. En este caso al acercar mis dos etiquetas RFID al lector, vemos lo siguiente en el archivo de salida:
On 2020-11-25 13:15:26 we got this serial: 79-EC-34-23
On 2020-11-25 13:15:49 we got this serial: 79-EC-34-23
On 2020-11-25 13:15:58 we got this serial: 79-EC-34-23
On 2020-11-25 13:19:01 we got this serial: 79-EC-34-23
On 2020-11-25 13:19:54 we got this serial: 79-EC-34-23
On 2020-11-25 13:21:09 we got this serial: 79-EC-34-23
On 2020-11-25 13:21:11 we got this serial: 79-EC-34-23
On 2020-11-25 13:21:14 we got this serial: 79-EC-34-23
On 2020-11-25 13:30:07 we got this serial: 79-EC-34-23
On 2020-11-25 13:35:28 we got this serial: 79-EC-34-23
On 2020-11-25 13:36:20 we got this serial: 79-EC-34-23
On 2020-11-25 13:39:26 we got this serial: 79-EC-34-23
On 2020-11-25 13:41:57 we got this serial: 79-EC-34-23
On 2020-11-25 13:44:29 we got this serial: 79-EC-34-23
On 2020-11-25 13:44:33 we got this serial: 79-EC-34-23
On 2020-11-25 13:44:35 we got this serial: 79-EC-34-23
On 2020-11-25 13:44:38 we got this serial: 79-EC-34-23
On 2020-11-25 13:44:45 we got this serial: 79-EC-34-23
On 2020-11-25 13:47:29 we got this serial: 79-EC-34-23
On 2020-11-25 13:47:34 we got this serial: 79-EC-34-23
On 2020-11-25 13:53:48 we got this serial: 79-EC-34-23
On 2020-11-25 13:56:10 we got this serial: 79-EC-34-23
On 2020-11-25 13:56:11 we got this serial: 79-EC-34-23
On 2020-11-25 13:56:13 we got this serial: 79-EC-34-23
On 2020-11-25 13:56:14 we got this serial: 79-EC-34-23
On 2020-11-25 14:00:55 we got this serial: 79-EC-34-23
On 2020-11-25 14:06:19 we got this serial: 79-EC-34-23
On 2020-11-25 14:07:24 we got this serial: 79-EC-34-23
On 2020-11-25 14:07:30 we got this serial: 79-EC-34-23
On 2020-11-25 14:08:22 we got this serial: 79-EC-34-23
On 2020-11-25 14:13:22 we got this serial: 79-EC-34-23
On 2020-11-25 14:13:30 we got this serial: 79-EC-34-23
On 2020-11-25 15:07:22 we got this serial: 79-EC-34-23
On 2020-11-25 15:07:24 we got this serial: 79-EC-34-23
On 2020-11-25 15:07:26 we got this serial: 79-EC-34-23
On 2020-11-25 15:07:26 we got this serial: 79-EC-34-23
On 2020-11-25 15:07:28 we got this serial: 79-EC-34-23
On 2020-11-25 15:07:29 we got this serial: 79-EC-34-23
On 2020-11-25 15:07:31 we got this serial: 79-EC-34-23
On 2020-11-25 15:07:39 we got this serial: EC-4A-AB-89
On 2020-11-25 15:07:40 we got this serial: EC-4A-AB-89
On 2020-11-25 15:07:40 we got this serial: EC-4A-AB-89
On 2020-11-25 15:07:41 we got this serial: EC-4A-AB-89
On 2020-11-25 15:43:13 we got this serial: 79-EC-34-23
On 2020-11-25 15:43:14 we got this serial: 79-EC-34-23
On 2020-11-25 15:43:15 we got this serial: 79-EC-34-23
On 2020-11-25 15:43:16 we got this serial: 79-EC-34-23
On 2020-11-25 15:43:16 we got this serial: 79-EC-34-23
On 2020-11-25 15:43:17 we got this serial: 79-EC-34-23
On 2020-11-25 15:43:17 we got this serial: 79-EC-34-23
En este caso hice varias pruebas con ambas tarjetas, y todas funcionaron. Como te dije, puedes guardar el serial en otro lugar o hacer cualquier otra cosa, aquí solo te pongo un ejemplo.
Poniendo todo junto
Dejo el código completo tanto de la tarjeta como el de PHP en mi GitHub. No olvides que el código del servidor debe ir en htdocs, /var/www/public_html o la carpeta de tu servidor de acuerdo a tu configuración.
Te invito también a leer más sobre PHP o sobre la ESP8266.